5. 캡슐화(Encapsulation)
클래스를 만들때 가장 큰 특징은 캡슐화와 은닉화이다.
5.1 내부 속성이나 메서드 명명 규칙 관행
5.2 보호된 이름: _이름
5.2.1 메서드로 보호 속성 감추기
- 보호된 이름 사용
- 언더바의 사용방식
- getter, setter를 파이썬에서는 지원하지 않아서 이를 따로 함수로 만들어서 사용해야한다.
{'_name': '춘식이', '_age': 3}
춘식이
3
춘식이
3
5.3 맹글링(Mangling)을 이용한 정보 은닉
- 속성이나 메소드에 대한 맹글링 처리
- 실제 실행할때 다른 형태로 이름을 바꾸어버린다(알고 있는 이름으로 검색해도 이름이 바뀌어있어서 접근이 불가능하게 만듬, 어떤식으로 이름이 바뀌는지를 알고있으면 쉽게 접근가능해지는 한계점이 있음)
{'_Mangling__name': '춘장이', '_Mangling__age': 31}
춘장이
31
춘장이
31
클래스의 네임스페이스를 확인
mappingproxy({'_Mangling__set': <function Mangling.__set at 0x7ee7f7001b40>,
'__dict__': <attribute '__dict__' of 'Mangling' objects>,
'__doc__': None,
'__init__': <function Mangling.__init__ at 0x7ee7f7001ab0>,
'__module__': '__main__',
'__weakref__': <attribute '__weakref__' of 'Mangling' objects>,
'getage': <function Mangling.getage at 0x7ee7f7001cf0>,
'getname': <function Mangling.getname at 0x7ee7f7001c60>})
맹글링
7
파이썬의 클래스는 반쪽이라 할 수 있다,
클래스의 접근 제어에 대한 메커니즘이 덜 엄격하다는 점에서 그렇다.
- Public Members: 기본적으로 모든 클래스 멤버(변수 및 메서드)는 공개(public)되어 있습니다.
- Protected Members: 밑줄 한 개 (_member)로 시작하는 멤버는 프로텍티드(protected)로 간주되지만, 이는 단지 암묵적인 규칙일 뿐 실제로 접근을 막지는 않습니다.
- Private Members: 밑줄 두 개 (__member)로 시작하는 멤버는 네임 맹글링(name mangling)을 통해 외부에서 접근하기 어렵게 만듭니다. 하지만 완전히 접근이 불가능한 것은 아니며, 특정 네이밍 규칙을 사용하여 여전히 접근할 수 있습니다.
5.4 Property를 이용한 정보 은닉
- 프로퍼티로 속성을 숨기기
- 파이썬의 property 데코레이터를 사용하여 클래스의 속성을 캡슐화하고, 이를 통해 정보 은닉(information hiding)을 구현하는 방법
- property는 클래스 속성에 대한 접근자와 설정자를 정의하는데 사용되며, 이를 통해 속성에 대한 접근 방식을 제어할 수 있다.
mappingproxy({'__dict__': <attribute '__dict__' of 'PropertyClass' objects>,
'__doc__': None,
'__init__': <function PropertyClass.__init__ at 0x7ee7f7002ef0>,
'__module__': '__main__',
'__weakref__': <attribute '__weakref__' of 'PropertyClass' objects>,
'name': <property object at 0x7ee7f702f5b0>})
은식이
금식이
{'_name': '금식이'}
금식이
동식이
6. 상속(Inheritance)
.1.1 상속 시 초기화 메서드 처리
- 부모 클래스의 초기화 모듈을 이용(이전의 클래스를 재활용할 수 있는 속성)
- 상속하는 클래스는 부모 클래스(슈퍼 클래스), 상속 받는 클래스는 자식 클래스(서브 클래스)
mappingproxy({'__dict__': <attribute '__dict__' of 'Parent' objects>,
'__doc__': None,
'__init__': <function Parent.__init__ at 0x7ee7f7002320>,
'__module__': '__main__',
'__weakref__': <attribute '__weakref__' of 'Parent' objects>})
mappingproxy({'__module__': '__main__', '__doc__': None})
<__main__.Child object at 0x7ee8280c1840>
{'name': '자식', 'age': 13}
6.1.2 Super class와 sub class 관계 이해하기
- 상속관계 확인하기
(<class 'object'>,)
(<class '__main__.GrandParent'>,)
(<class '__main__.Parent'>,)
True
True
True
6.1.3 상속에 따른 네임스페이스 검색
- 상속에 따른 네임스페이스 검색
A 클래스 속성
A 클래스 속성
B 클래스 속성
A 클래스 속성
A 클래스 속성
어딘가에 형태를 잡아두고 거기에 접근하도록 함(형태는 메모리에 공간을 잡을때 추가로 확보함)
네임스페이스 비교
mappingproxy({'A_cls': 'A 클래스 속성',
'__dict__': <attribute '__dict__' of 'A' objects>,
'__doc__': None,
'__module__': '__main__',
'__weakref__': <attribute '__weakref__' of 'A' objects>})
mappingproxy({'__module__': '__main__', '__doc__': None, 'A_cls': 'B 클래스 속성'})
mappingproxy({'__module__': '__main__', '__doc__': None})
6.2 상속할 때 자식 클래스 초기화 기능 추가
- __ init_subclass __ 클래스 메소드
Help on built-in function __init_subclass__:
__init_subclass__(...) method of builtins.type instance
This method is called when a class is subclassed.
The default implementation does nothing. It may be
overridden to extend subclasses.
<class 'type'> <class '__main__.Sub'>
sub
네임스페이스 비교
mappingproxy({'__dict__': <attribute '__dict__' of 'Super' objects>,
'__doc__': None,
'__init_subclass__': <classmethod(<function Super.__init_subclass__ at 0x7ee7f7049000>)>,
'__module__': '__main__',
'__weakref__': <attribute '__weakref__' of 'Super' objects>})
mappingproxy({'__module__': '__main__', '__doc__': None, 'name': 'sub'})
6.3 다중 상속(Multiple Inheritance)
6.3.1 다중상속 클래스 읽는 순서
- 다중 상속 Class 정의 및 읽는 순서 확인하기
네임스페이스
- mro - 메소드 해결하는 순서
[<class '__main__.Child'>,
<class '__main__.Parent1'>,
<class '__main__.Parent2'>,
<class 'object'>]
- 두개의 상속을 받았을 때 부모클래스가 동일한 이름을 가진 경우1에 Init인지 2의 init인지 확인하기 위해 순서를 정해놓은것(먼저 나온것을 기준으로)
Parent1
- 다른 부모 클래스의 __ init __ 메소드를 사용하고 싶을 경우
Parent1
{'name': '다중상속'}
Parent2
{'name': '다중상속', 'age': 33}
6.4 super 클래스 이해하기
- super 클래스 이해하기
AAA
{'name': '슈퍼우먼', 'age': 27}
두 개를 상속 받았을때
class C
class A
class B
{'name': '슈퍼우먼', 'age': 27}
class C
class A
{'name': '슈퍼맨'}
6.5 Mixin 패턴 이해하기
6.5.1 메서드만 처리하는 Mixin 클래스 정의
- Mixin 클래스 하나를 상속처리
- Mixin 클래스는 이름에 Mixin을 붙이는것이 관례이다.
11
30
HelloWorld
HelloHelloHelloHelloHello
[1, 2, 3, 4, 6, 7]
[1, 2, 3, 4, 1, 2, 3, 4] # 두개 존재하니까 곱하기해서 앞 리스트 두배
6.5.2 Mixin 다중 상속 시 주의할 사항
- 여러 Mixin 클래스에 동일한 메소드
A Mixin
B Mixin
- Mixin 클래스 다중상속 처리: 다른 메소드 이름
- 따로 지정을 하지 않아도 큰 문제가 되지 않음
다중상속
777
7. 다형성(Polymorphism)
7.1 다형성이란
다형성(Polymorphism)은 프로그래밍 언어의 요소들이 다양한 자료형에 속하면서도 일관된 인터페이스를 통해 처리될 수 있는 성질을 말한다. 특히 객체지향 프로그래밍(OOP)에서는 상속을 통해 부모 클래스와 자식 클래스가 동일한 메서드를 구현하고 이를 통해 다양한 객체를 일관되게 다룰 수 있다.
다형성의 특징
- 자료형의 유연성: 프로그래밍 언어의 각 요소(상수, 변수, 식, 객체, 함수, 메서드 등)가 다양한 자료형에 속하는 것이 허용된다.
- 다양한 구현: 상속 관계에 있는 클래스들이 동일한 메서드를 각각의 방식으로 구현할 수 있다.
다형성과 단형성
- 다형성: 각 요소가 여러 자료형에 속할 수 있는 성질.
- 단형성: 각 요소가 한 가지 형태만 가지는 성질.
다형성의 유형
- 오버라이딩(Overriding)
- 부모 클래스의 메서드를 자식 클래스에서 재정의하여 사용
- 자식 클래스의 메서드가 부모 클래스의 메서드를 대체
2. 오버로딩(Overloading)
- 동일한 이름의 메서드를 여러 개 정의하여 다양한 인자와 함께 사용할 수 있게 한다.
- 파이썬은 메서드 오버로딩을 지원하지 않지만, 특정 모듈을 사용하여 구현할 수 있다.
파이썬은 이름으로만 관리하므로 동일한 기능을 여러 개로 분리할 수 없지만 특정 모듈을 사용해서 오버로딩이 가능하다. (파이썬에서는 기본적으로 오버라이딩만 한다 생각하면 된다)
- 부모 클래스의 메소드를 오버라이딩
Parent1
Parent2
child 오버라이딩
child 33
오버라이딩
33
7.3 메서드 오버로딩(Overloading)
- overload 모듈을 이용
- 파이썬에서는 기본적으로 안됨으로 지원하는 라이브러리를 pip로 설치함
- 코렙은 리눅스 위에서 동작함으로 터미널을 써야하는데, 터미널을 쓸 수 없으므로 !를 사용해서 pip 설치를 해줌
- 오버로드가 안되는 것을 내부함수를 집어 넣음으로서 오버로딩된 결과랑 비슷하게 표현하는것(안되는것을 되게 하니까 빙빙 돌아서 작성한것이다)
no args method
one args method hello
two args method hello world
TypeError: invalid call argument(s) #3개는 메소드 구현을 안해놓았기 때문에 오류 발생함
mappingproxy({'__dict__': <attribute '__dict__' of 'A' objects>,
'__doc__': None,
'__module__': '__main__',
'__weakref__': <attribute '__weakref__' of 'A' objects>,
'method': <function A.method at 0x7ee7f70b69e0>})
<class 'function'>
{'__wrapped__': <function A.method at 0x7ee7f70b6200>,
'add': <function overload.<locals>.add at 0x7ee7f70b6a70>}
7.4 연산자 오버로딩(Operator Overloading)
- 연산자 오버로딩 이해하기
Parent class
Child class
Person class
Person class
True
True
100.6
200.6
<class '__main__.Float_'>
float 클래스 상속받지 않고 진행
100.6
200.6
<class 'float'>
7.5 덕 타이핑(Duck typing) 패턴 이해하기
- 함수 내에서 인터페이스 처리
- 파이썬과 같은 동적 타입 언어에서 사용되는 개념으로, 객체의 실제 타입보다는 객체가 수행할 수 있는 메서드나 속성에 의해 객체의 타입을 결정하는 패턴
덕타이핑의 유래
"If it looks like a duck, swims like a duck, and quacks like a duck, then it probably is a duck."
떤 객체가 특정 타입의 객체처럼 행동한다면, 그 객체를 그 타입으로 간주할 수 있다는 의미
덕 타이핑은 인터페이스가 아닌 객체의 행위를 중심으로 타입을 판단하는 방식이다.
덕 타이핑의 특징
- 유연성: 덕 타이핑은 객체의 타입을 명시적으로 지정하지 않아도 되기 때문에 코드의 유연성이 높다.
- 재사용성: 동일한 인터페이스를 구현하는 여러 객체를 쉽게 교체하여 사용할 수 있다.
- 단순함: 객체가 필요한 메서드나 속성을 구현하기만 하면 되므로, 복잡한 상속 구조 없이도 다형성을 구현할 수 있다.
클래스간의 관계는 상관없이, 오브젝트가 뭐가 들어갔냐에 따라서 동작 결과가 바뀐다.
quack quack
Hello !
- class내에서 인터페이스 제공
quack quack
Hello !
8. 메타 클래스(Meta Class)
파이썬에서 메타 클래스는 클래스의 클래스를 정의하는 도구로, 클래스를 생성하는 방식을 제어할 수 있게 합니다. 즉, 메타 클래스는 클래스가 생성될 때 그 동작을 수정하거나 확장하는 데 사용됩니다. 기본 메타 클래스는 type이며, 이를 확장하여 커스터마이징할 수 있습니다.
메타 클래스의 활용 이유
- 클래스 커스터마이징: 클래스 생성 시 특정 속성을 자동으로 추가하거나 수정할 수 있습니다.
- 유효성 검사: 클래스가 생성될 때 특정 조건을 검사하고, 조건에 맞지 않으면 예외를 발생시킬 수 있습니다.
- 패턴 구현: 싱글톤 패턴 등 특정 디자인 패턴을 구현할 수 있습니다.
8.1.1 파이썬에서 메타 클래스로 클래스가 만들어지는 순서
- 적절한 클래스 결정
- 클래스 네임스페이스 준비
- 클래스의 본체 실행
- 클래스 객체를 생성하여 반환값으로 제공
- 메타클래스로 클래스 생성하기
<class 'type'>
<class '__main__.Klass'>
mappingproxy({'__dict__': <attribute '__dict__' of 'Klass' objects>,
'__doc__': None,
'__module__': '__main__',
'__weakref__': <attribute '__weakref__' of 'Klass' objects>,
'name': '메타클래스로 클래스 생성'})
메타 클래스가 아닌 실제로 클래스를 만드는 경우
<class 'type'>
<class '__main__.Klass'>
mappingproxy({'__dict__': <attribute '__dict__' of 'Klass' objects>,
'__doc__': None,
'__module__': '__main__',
'__weakref__': <attribute '__weakref__' of 'Klass' objects>,
'name': ' 클래스 정의문으로 클래스 생성'})
내부적으로는 그냥 만드는거나, 메타 클래스로 만드는 것이나 결과는 똑같은 것을 확인하였다.
8.1.2 클래스 상속과 메타 클래스의 관계
- 사용자 메타클래스로 변경하기
<class '__main__.Klass'>
<class '__main__.MyMeta'>
9. 연관관계(Association)
9.1 연관관계
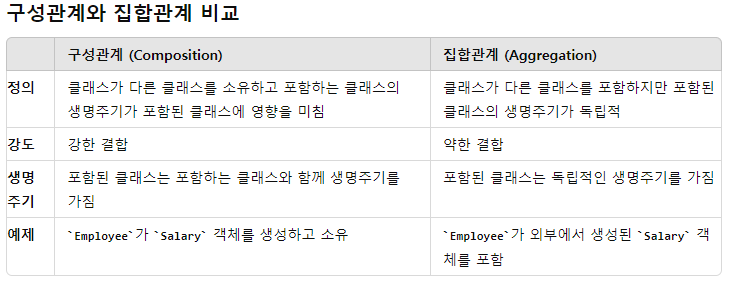
- 구성관계 (composition)
- 구성관계는 클래스가 다른 클래스를 소유하며, 포함된 클래스의 생명주기가 포함하는 클래스에 의해 결정되는 경우를 의미
- 포함하는 클래스가 삭제되면 포함된 클래스도 함께 삭제된다.
- 강한 결합관계이다.
Total: 2410
mployee 클래스는 Salary 객체를 생성하고 포함하는데, Salary 객체는 Employee 객체의 생명주기에 따라 존재하며, Employee 객체가 삭제되면 Salary 객체도 함께 삭제된다.
- 집합 관계(Aggregation)
- 집합관계는 클래스가 다른 클래스를 포함하지만, 포함된 클래스의 생명주기가 포함하는 클래스와 독립적인 경우를 의미
- 포함된 클래스는 포함하는 클래스와 독립적으로 존재할 수 있다.
- 약한 결합 관계이다.
Total: 2410
Employee 클래스는 Salary 객체를 생성하지 않고, 외부에서 전달받는다. Salary 객체는 Employee 객체와 독립적으로 존재할 수 있으며, Employee 객체가 삭제되더라도 Salary 객체는 계속 존재할 수 있다.
<__main__.Salary object at 0x7ee7f70ab6d0> # Salary 객체가 그대로 살아있는것을 알 수 있다.
9.2 위임 패턴 처리
- 위임 패턴은 객체 지향 프로그래밍에서 클래스가 다른 클래스의 기능을 사용하기 위해 그 클래스의 인스턴스를 포함하는 패턴이다.
- 코드의 재사용성을 높이고, 기능의 분리를 명확하게 할 수 있는 장점이 있다.
- 위임 메소드를 사용하기
{'person': <__main__.Person object at 0x7ee7f70aada0>, 'college': '숭실대'}
# Student 클래스는 Person 클래스를 포함하여 초기화 한다. __dict__ 속성을 출력하면 person 속성이 Person 객체를 가리키는 것을 확인할 수 있다.
위임 매서드 사용하기
위임
22
# Student 클래스는 Person 클래스의 메서드인 getname과 getage를 위임하여 호출한다.
추가 위임 예시
- 위임 패턴으로, 여러 클래스에서 공통적으로 사용되는 기능을 하나의 클래스로 모듈화 하여 다른 클래스에서 이를 위임받아 사용할 수 있다.
Engine started
ngine stopped
# Car 클래스는 Engine 클래스의 기능을 위임받아 사용
# Car 클래스는 Engine 클래스의 메서드를 직접 호출하여 엔진을 시작하고 정지할 수 있다.
'PYTHON-BACK' 카테고리의 다른 글
| #파이썬 기초 10일차_1 (0) | 2024.07.10 |
|---|---|
| #파이썬 기초 9일차_2 (0) | 2024.07.09 |
| #파이썬 기초 8일차_2 (0) | 2024.07.08 |
| #파이썬 기초 8일차_1 (1) | 2024.07.08 |
| #파이썬 기초 7일차_2 (1) | 2024.07.05 |

